


Photo by Arnold Francisca on Unsplash
How to Create a Django Custom User Model
React and Django Authentication Series - Part 1


Table of contents
In this tutorial, I will teach you how to implement a custom user model in Django. We will do this by extending the Django user model.
This tutorial is the first part of the full React and Django authentication series. In this tutorial series, I will teach how to implement the system that I have used for many of my projects using the Django Rest Framework for the API and React Js for the frontend.
We will start with the project setup.
Project Setup
We will start by creating a virtual environment in the terminal. For this project, I will be using virtualenv. Don't forget to activate it.
python -m venv env
env\scripts\activate
Now we will install the libraries we will be using throughout the project. I will be using Django 3.2.10 in this project
pip install django djangorestframework djangorestframework-simplejwt
We can proceed to create the main project.
django-admin startproject django_react_auth
cd django_react_auth
Let's create a new application called accounts.
python manage.py startapp accounts
Now we can add our new accounts app and the other libraries we had installed to the installed apps in the settings.py file.
# django_react_auth/settings.py

INSTALLED_APPS = [
    'django.contrib.admin',
    'django.contrib.auth',
    'django.contrib.contenttypes',
    'django.contrib.sessions',
    'django.contrib.messages',
    'django.contrib.staticfiles',
    'rest_framework',
    'rest_framework_simplejwt',
    'accounts'
]
Creating the Model Manager
First, we will create a custom user manager, this will let us customize the user creation process.
# accounts/models.py

from django.db import models
from django.utils.translation import gettext_lazy as _
from django.contrib.auth.models import AbstractBaseUser, BaseUserManager, PermissionsMixin


class CustomAccountManager(BaseUserManager):
    def create_superuser(self, email, username, first_name, password, **other_fields):

        other_fields.setdefault('is_staff', True)
        other_fields.setdefault('is_superuser', True)
        other_fields.setdefault('is_active', True)

        if other_fields.get('is_staff') is not True:
            raise ValueError(
                'Superuser must be assigned to is_staff=True.')
        if other_fields.get('is_superuser') is not True:
            raise ValueError(
                'Superuser must be assigned to is_superuser=True.')

        return self.create_user(email, username, first_name, password, **other_fields)

    def create_user(self, email, username, first_name, password, **other_fields):

        if not email:
            raise ValueError(_('You must provide an email address'))

        email = self.normalize_email(email)
        user = self.model(email=email, username=username,
                          first_name=first_name, **other_fields)
        user.set_password(password)
        user.save()
        return user
Basically, we are just creating two methods, one for a creating superuser, and one for creating normal users.
User Model
Let's now create our custom user model. For this, we will extend the AbstractBaseUser class and we will add the PermissionsMixin.
# accounts/models.py

class CustomUser(AbstractBaseUser, PermissionsMixin):
    email = models.EmailField(_('email address'), unique=True)
    username = models.CharField(max_length=150, unique=True)
    first_name = models.CharField(max_length=150, blank=True)
    start_date = models.DateTimeField(auto_now_add=True)
    about = models.TextField(_(
        'about'), max_length=500, blank=True)
    is_staff = models.BooleanField(default=False)
    is_active = models.BooleanField(default=True)

    objects = CustomAccountManager()

    USERNAME_FIELD = 'email'
    REQUIRED_FIELDS = ['username', "first_name"]

    def __str__(self):
        return self.username
As you can see we have added some new fields. We also changed the USERNAME_FIELD to be the email, this will enable us to log in with our email instead of our username.
In order for this to work, we need to add this line in the settings.py file.
AUTH_USER_MODEL = 'accounts.CustomUser'
Now we can run our migrations and create a superuser.
python manage.py makemigrations
python manage.py migrate
python manage.py createsuperuser
Admin
Let's set the admin page to see, create and update our users.
# accounts/admin.py

from django.contrib import admin
from .models import CustomUser
from django.contrib.auth.admin import UserAdmin
from django.forms import Textarea

class UserAdminConfig(UserAdmin):
    model = CustomUser
    search_fields = ('email', 'username', 'first_name',)
    list_filter = ('email', 'username', 'first_name', 'is_active', 'is_staff')
    ordering = ('-start_date',)
    list_display = ('email', 'username', 'first_name',
                    'is_active', 'is_staff')
    fieldsets = (
        (None, {'fields': ('email', 'username', 'first_name',)}),
        ('Permissions', {'fields': ('is_staff', 'is_active')}),
        ('Personal', {'fields': ('about',)}),
    )
    formfield_overrides = {
        CustomUser.about: {'widget': Textarea(attrs={'rows': 10, 'cols': 40})},
    }
    add_fieldsets = (
        (None, {
            'classes': ('wide',),
            'fields': ('email', 'username', 'first_name', 'password1', 'password2', 'is_active', 'is_staff')}
         ),
    )


admin.site.register(CustomUser, UserAdminConfig)
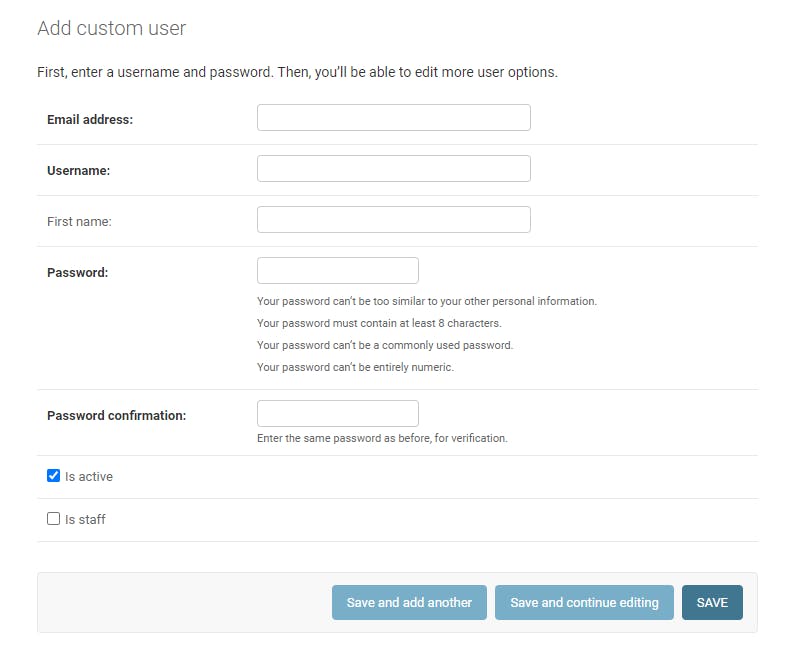
Run the server and login into the admin panel. You should be able to see and create users.
Conclusion
In this first part, we created a custom user model, this will enable us to log in to the system with our email instead of the username. We can also add new fields to the model if needed without having to create another user profile model.
I have created a Github repository where I will be uploading the code for this series. You can check it out here
If you have any questions about this tutorial feel free to leave a comment.